Preparing to start with AAPS
Welcome. This documentation aims to guide users who are preparing to setup and start using the Android Artificial Pancreas System (AAPS).
Finding your way around the documentation
An index and explanation of the documentation structure can be found here, you can also reach it by clicking on the AAPS symbol at the top left of the documentation. There you will find an overview of the purpose of the different documentation sections. You can also use the headings to the left of this page to navigate through the documentation. Finally, there is a handy search function, directly below the AAPS symbol.
We aim to make it easy to determine both the capabilities and limitations of AAPS. It can be disappointing to discover after investing time in reading the documentation that you might not have a compatible insulin pump or CGM, or that AAPS offers different functionality than hoped for.
Many experience-related details in the AAPS documentation make more sense when you are actually using AAPS in real-time. Just as it is difficult to learn a sport only by reading the rules, it takes a combination of learning the foundations of the rules for safely operating AAPS and then learning how best to apply those rules as you start to use AAPS.
Safety First
“With great power comes great responsibility…”
Technical safety
AAPS has an extensive set of safety features. These impose constraints which are gradually removed through staged completion of a series of Objectives which involve testing specific parameters and answering multiple choice questions. AAPS features are unlocked as the Objectives are successfully completed. This process allows the user to migrate safely in stages from Open Loop to Closed Loop, while learning about the different features of AAPS.
The Objectives have been designed to achieve the best possible introduction to AAPS, taking into consideration the typical errors and general trends AAPS developers have observed with new users. Mistakes can happen because the beginner is inexperienced and too eager to get started with AAPS, or has overlooked key points. The Objectives aim to minimise these issues.
Medical safety
Avoid permanent and painful damage to your eyes and nerves
Caution is advised concerning rapid improvements in blood glucose control and lowering of HbA1c
An important safety consideration is that a rapid reduction in HbA1c and improved blood glucose control in those who have had elevated glucose levels for some time can cause permanent damage. Many people with diabetes are unaware of this, and not all clinicans make their patients aware of this issue.
This damage can include sight loss, and permanent neuropathy (pain). It is possible to avoid this damage occuring, by reducing average glucose levels more slowly. If you currently have an elevated HbA1c and are moving to AAPS (or any other closed loop system), please discuss this potential risk with your clinical team before starting, and agree a timescale with gradually decreasing safe glucose targets with them. You can easily set higher glucose targets in AAPS initially (currently, the highest target you can select is 10.6 mmol/L but you can also maintain a purposefully weak profile if needed), and then reduce the target as the months pass.
How quickly can I reduce my HbA1c without risking permanent damage?
One retrospective study of 76 patients reported that the risk of progression of retinopathy increased by 1.6 times, 2.4 times and 3.8 times if the Hba1C dropped 1%, 2% or 3% respectively over a 6 month period. They suggested that the “decrease in HbA1c value during any 6-month period should be limited to less than 2% in order to prevent the progression of retinopathy….Too rapid a decrease at the initiation of glycemic control could cause severe or transient exacerbation of the progression of retinopathy.”
N.B. If you use different HbA1c units (mmol/mol rather than %), click here for a HbA1c calculator tool.
In another retrospective evaluation of 954 patients, researchers noted that:
“With a decrease in HbA1c of 2–3% points over 3 months there was a 20% absolute risk of developing treatment-induced neuropathy in diabetes, with a decrease in HbA1c of >4% points over 3 months the absolute risk of developing treatment-induced neuropathy in diabetes exceeded 80%.”
A commentary on this work agreed that to avoid complications the goal should be to reduce A1c by <2% over 3 months. You can read other reviews on the topic here and here.
It is generally recognised that newly diagnosed type 1 diabetics (who often have very high HbA1c at diagnosis, before starting insulin therapy) appear to be able to rapidly reduce their HbA1c immediately after diagnosis without encountering these risks to the same extent, because they have not had elevated blood glucose levels for such a sustained period. However, it is still a consideration which you should discuss with your clinician.
No SGLT-2 inhibitors
NO SGLT-2 inhibitors
SGLT-2 inhibitors, also called gliflozins, inhibit reabsorption of glucose in the kidney. Gliflozins incalculably lower blood sugar levels, and so you MUST NOT take them while using a closed loop system like AAPS! There would be a significant risk of ketoacidosis and/or hypoglycemia! The combination of this medication with a system that lowers basal rates in order to increase BG is especially dangerous.
In a nutshell:
Example 1: risk of Hypo
During lunch, you use AAPS to bolus based on consuming 45g of glucose. The problem is that unbeknownst to AAPS, the inhibitors cause the body to eliminate some of the carbs resulting in your body having too much insulin compared to the absorbed Carbs, resulting in hypoglycemia.
Example 2: risk of Ketoacidosis
The inhibitors eliminate some of the carbs in the background causing a reduction in your BG. AAPS will automatically instruct the pump to decrease insulin intake including basal. Over time this can result in your BG remaining below target value to the point where the body does not have enough background insulin to absorb any carbs resulting in Ketoacidosis. Ordinarily, Ketoacidosis develops in T1D patients because their pump fails which would trigger alerts on their phone and be noticeable due to a high BG value. However, the danger with Gliflozins is that there would be no AAPS alerts as the pump remains operational and the BG potentially remains within target.
Common brand names of SGLT-2 inhibitors include: Invokana, Farxiga, Jardiance, Glyxambi, Synjardy, Steglatro, and Xigduo XR, others.
Key principles of looping with AAPS
The key principles and concepts of looping must be understood before using AAPS. This is achieved by investing your personal time into reading the AAPS documentation, and completing the Objectives which aim to provide you with a solid platform for safe and effective use of AAPS. The volume of AAPS documentation may seem overwhelming at first but be patient and trust the process - with the proper approach, you’ll get there!
The speed of progression will depend upon the individual, but be aware that completion of all the objectives typically takes 6 - 9 weeks. Many people start to build, install and setup AAPS well in advance of starting to use it. To aid with this, the system has a “virtual pump” which can be used during completion of the early objectives, so that you can become familiar with AAPS without actually using it to deliver insulin. A detailed breakdown of the timeline is given below, be aware that by objective 8 of AAPS you are closed looping, the later objectives add in additional features like SMS commands and automations which are useful to some users, but not essential to the core function of AAPS.
Success with AAPS requires a proactive approach, a willingness to reflect on the BG data and flexibility to make the necessary adjustments to AAPS in order to improve your outcomes. Just as it is nearly impossible to learn to play a sport by reading about the rules alone, the same can be said of AAPS.
Plan for delays and minor issues in getting everything set up and running
In the preliminary stages of getting started with AAPS, you may experience difficulties getting all the components of the loop communicating effectively with each other (and potential followers), and when fine-tuning your settings. Some glitches cannot be resolved until AAPS is used in everyday life, but plenty of help is available on the Facebook group and Discord. Please plan accordingly and choose “good” times, like a quiet morning of a weekend (i.e. not late at night or when you are tired, or before a big meeting or travel) to troubleshoot and resolve issues.
Technology compatibility
AAPS is only compatible with certain types of insulin pumps, CGMs and phones, and some technology may not be available for use in various countries. In order to avoid any disappointment or frustrations, please read the CGM, pump and phone sections.
App build time and progressing to full looping
The time to build the AAPS app depends on your level of expertise and technical ability. Typically for inexperienced users, it can take up to half a day or a full day (with help from the community) in order to build AAPS. The process will significantly speed up for newer AAPS versions, as you become more experienced.
To aid the build process there are dedicated sections:
List of questions and answers for frequent errors that are likely to occur in FAQs (Section K);
“How to install AAPS? (Section D) which includes Troubleshooting Subsection.
How long it takes to get to closed looping depends on the individual, but an approximate timescale for getting to full looping with AAPS can be found (here)
Keystore & configuration settings export file
A “keystore” (.jks file) is a password encrypted file unique to your own copy of AAPS. Your Android phone uses it to ensure that nobody else can upgrade your own copy without the keystore. In short, as part of the AAPS build, you should:
Save the your keystore file (.jks file used to sign your app) in a safe place;
Keep a note of your password for your keystore file.
This will ensure that you can use that exact same keystore file each time an updated version of AAPS is created. On average, there will be 2 AAPS updates required each year.
In addition, AAPS provides the ability to export all your configuration settings. This ensures that you can safely recover your system while changing phones, upgrading/reinstalling the application with minimum disruption.
Troubleshooting
Please feel free to reach out to the AAPS community if there is anything you feel unsure about - there is no such thing as a silly question! All users with various levels of experience are encouraged to ask questions. Response times to questions are usually quick due to the number of AAPS users.
ask on the AAPS Facebook group
ask on the AAPS Discord channel
Where to go for help?
This section is aimed to provide new users with links on resources in order to get help including accessing community support made up of both new and experienced users who can clarify questions, and resolve the usual pitfalls that come with AAPS.
Section For Clinicians
This is a section specificially for clinicians who want to know more about AAPS and open source artificial pancreas technology. There is also guidance on how to talk to your clinical team in the Introduction.
What are we going to build and install?
This diagram provides an overview of the key components (both hardware and software) of the AAPS system:
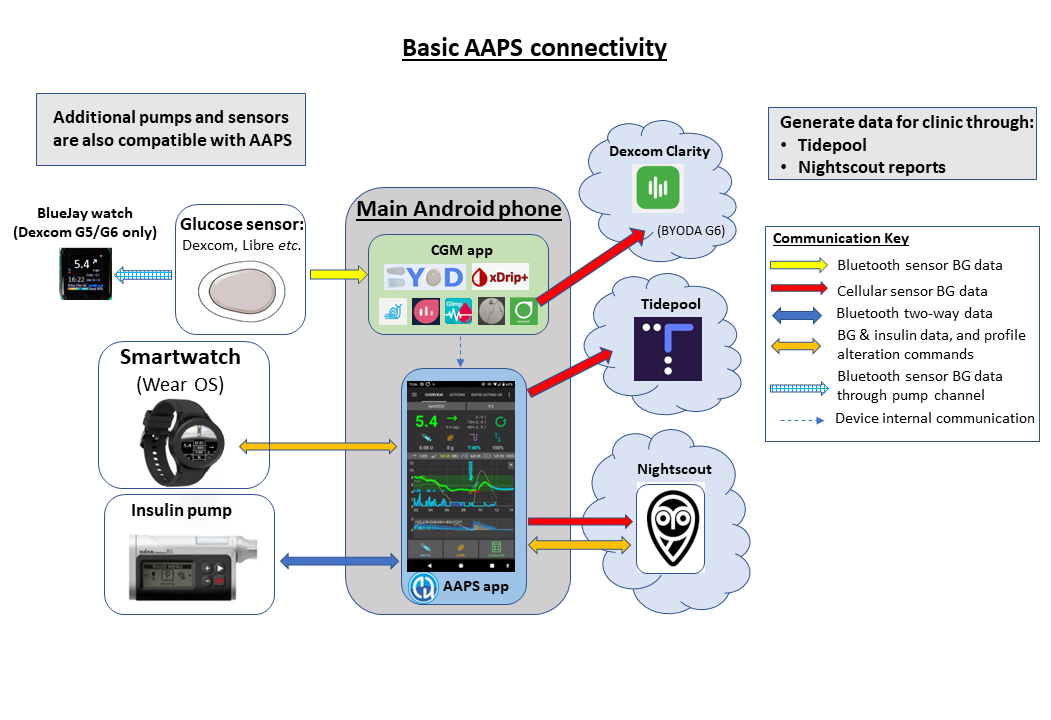
In addition to the three basic hardware components (phone, pump, glucose sensor), we also need:
The AAPS app
A reporting server and
A continuous glucose monitor (CGM) app
1) An Android Phone Application: AAPS
AAPS is an app that runs on android smartphones & devices. You are going to build the AAPS app (an apk file) yourself, using a step-by-step guide, by downloading the AAPS source code from GitHub, installing the necessary programs (Android Studio, GitHub desktop) on your computer and building your own copy of AAPS app. You will then transfer the AAPS app across to your smartphone (by email, USB cable etc.) and install it.
2) A reporting server: NightScout (Tidepool*)
In order to fully take advantage of AAPS, you need to setup a Nightscout server. You can do this yourself (link to instructions) or alternatively, pay a small fee for a managed Nightscout service to be set up for you (link to T1 pal 10.be etc). Nightscout is used to collect data from AAPS over time and can generate detailed reports correlating CGM and insulin patterns. It is also possible for caregivers to use Nightscout to remotely communicate with the AAPS application, to oversee their child’s diabetic management. Such remote communication features include real-time monitoring of glucose and insulin levels, remote bolusing of insulin (by texting) and meal announcements. Attempting to analyse your diabetes performance by looking at CGM data separately from the pump data is like driving a car where the driver is blind and the passenger describes the scene. Tidepool is also available as an alternative to Nightscout, for AAPS versions 3.2 and later.
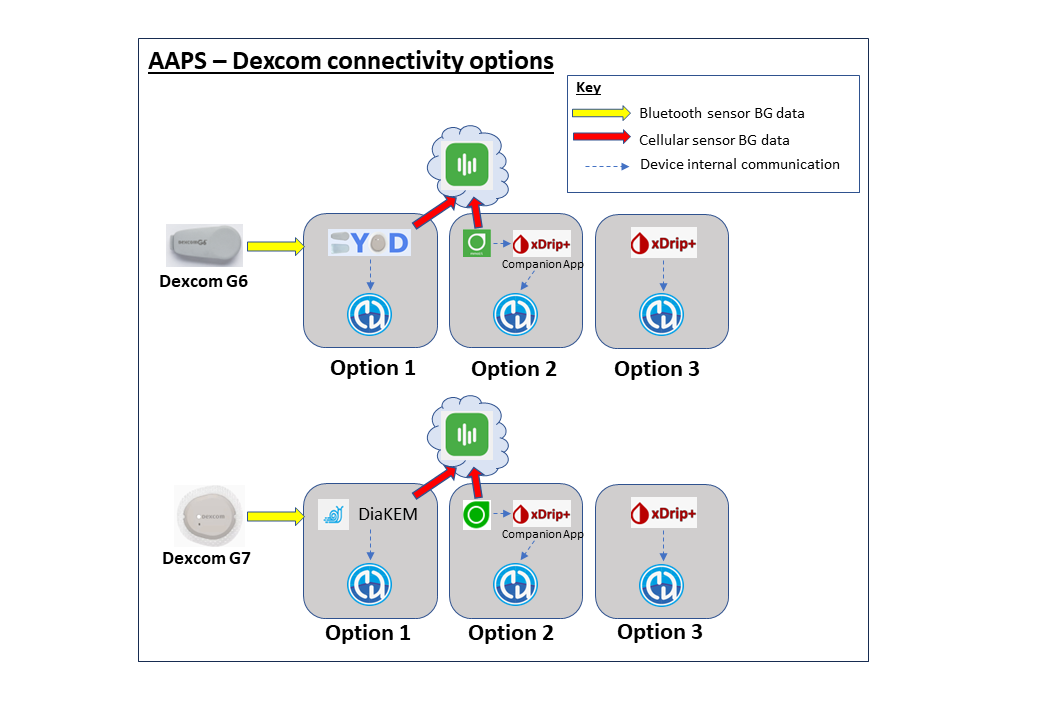
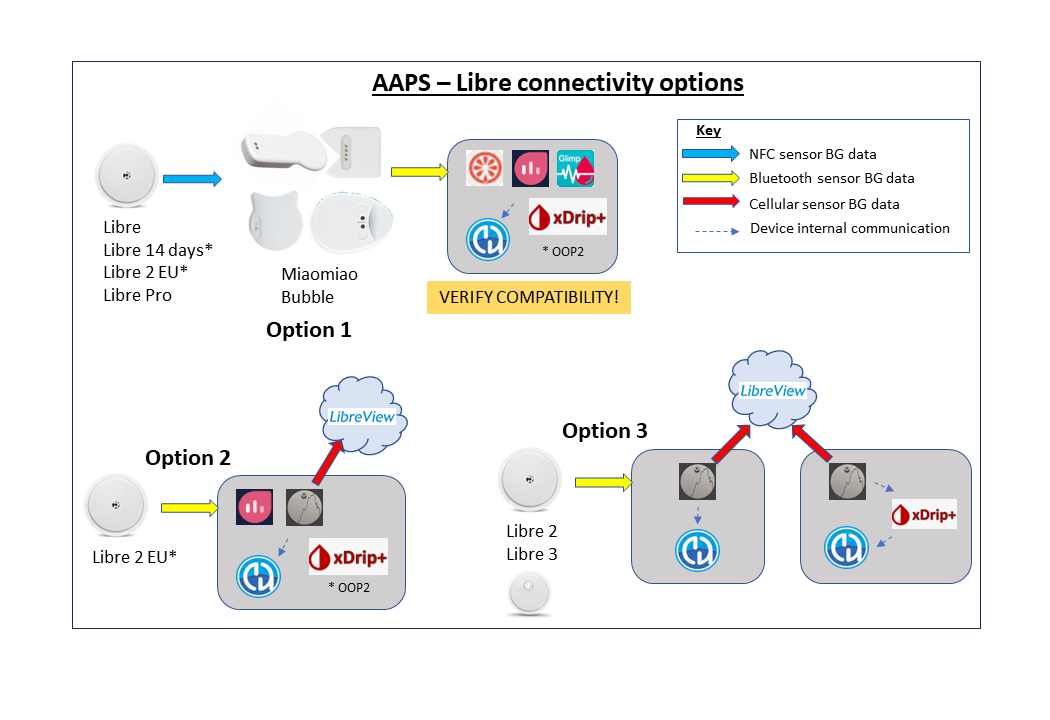
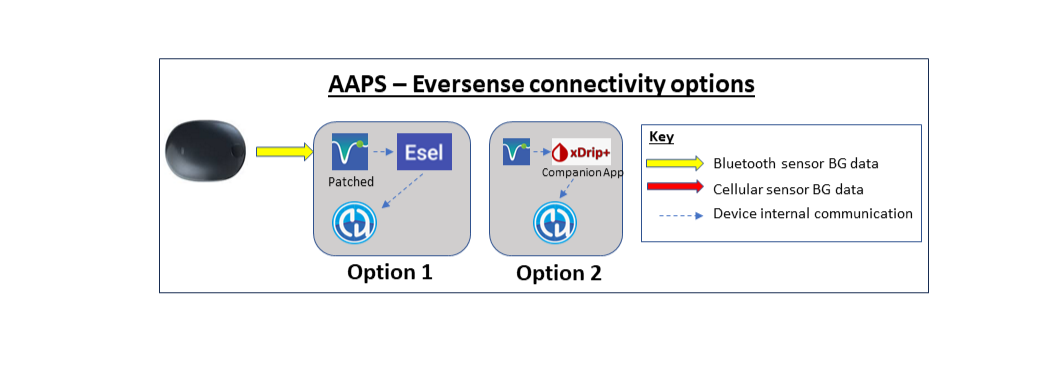
3) CGM sensor app
Depending on your glucose sensor/CGM, you will need a compatible app for receiving glucose readings and sending them to AAPS. The different options are shown below and more information is given in the compatible CGMs section:
Maintenance of the AAPS system
Both Nightscout and AAPS must be updated approximately once a year, as improved versions are released. In some cases, the update can be delayed, in others it is strongly recommended or considered essential for safety. Notification of these updates will be given on the Facebook groups and Discord servers. The release notes will make it clear what the scenario is. There are likely to be many people asking similar questions to you at update time, and you will have support for performing the updates.
How long will it take to set everything up?
As mentioned earlier, using AAPS is more of a “journey” that requires investment of your personal time. It is not a one-time setup. Current estimates for building AAPS, installing and configuring AAPS and CGM software and getting from open loop to hybrid closed looping with AAPS are about 2 to 3 months overall. It is therefore suggested that you prioritise building the AAPS app and working through the early objectives as soon as possible, even if you are still using a different insulin delivery system (you can use a virtual pump up to objective 5). Here is an approximate timeframe:
Tasks |
Approx time |
|---|---|
initial reading of the documentation: |
1-2 days |
installing/configuring PC to allow the build: |
2-8 hours |
building a Nightscout server: |
1 hour |
installing CGM app (xdrip or BYODA or …) |
1 hour |
configuring CGM->xdrip->APPS initially: |
1 hour |
configuring AAPS->pump initially: |
1 hour |
configuring AAPS->NightScout (reporting only): |
1 hour |
optional (for Parents) - configuring NightScout <-> AAPS & NSFollowers: |
1 hour |
Objective 1: Setting up visualization and monitoring, analysing basals and ratios |
1 hour |
Objective 2: Learn how to control AAPS |
2 hour |
Objective 3: Prove your knowledge |
Up to 14 days |
Objective 4: Starting on an open loop |
7 days |
Objective 5: Understanding your open loop, including its temp basal recommendations |
7 days |
Objective 6: Starting to close the loop with Low Glucose Suspend |
Up to 5-14 days |
Objective 7: Tuning the closed loop, raising maxIOB and gradually lowering BG targets |
Up to 7 days |
Objective 8: Adjust basals and ratios if needed, and then enable autosens |
Up to 7-14 days |
Objective 9: Enabling additional oref1 features, such as super micro bolus (SMB) |
Up to 14 days |
Objective 10: Automation |
1 day |
Once you are fully operational on AAPS, you will need to fine tune your setting parameters in order to improve your overall diabetic management.
Requirements
Medical considerations
In addition to the medical warnings in the safety section there are also different parameters, depending on which insulin you are using in the pump.
Insulin choice
AAPS calculations are based on insulin concentrations of 100U/ml (same as pump’s standard). The following types of insulin profile presets are supported:
Rapid-Acting Oref: Humalog/NovoRapid/NovoLog
Ultra-Rapid ORef: Fiasp
Lyumjev:
For Experimental/Advanced users only:
Free-Peak Oref: Allows you to define peak of the insulin activity
Technical
This documentation aims to reduce the technical expertise required to an absolute minimum. You will need to use your computer to build the AAPS application in Android Studio (step-by-step instructions). You also need to set up a server over the internet in a public cloud, configure several android phone apps and develop expertise in diabetes management. This can be achieved by moving step-by-step, being patient, and help from the AAPS community. If you are already able to navigate the internet, manage your own Gmail emails, and keep your computer up-to-date, then it is a feasible task to build the AAPS. Just take your time.
Smartphones
AAPS and Android Versions
The current version of AAPS (3.2) requires an Android smartphone with Google Android 9.0 or above. If you are considering buying a new phone, (as of July 2024), Android 13 is preferred. Users are strongly encouraged to keep their build of AAPS up to date for safety reasons, however for users unable to use a device with Android 9.0 or newer, earlier versions of AAPS compatible for older Android versions like Android 8 and Android 7, remain available from previous releases (check the release notes for legacy versions).
Smartphone model choice
The exact model you buy depends on the desired function(s). There are two archived spreadsheets of compatible smartphones and smartphones and watches. The spreadsheets are no longer updated because there are so many possible models, therefore we now suggest searching the support groups (Facebook or Discord) for “phone”, or the specific model you are thinking of getting. Create a new post to ask questions about it if you still need more information.
To make a donation of smartphone or smartwatch models that still need testing, please email donations@androidaps.org.
Users are encouraged to keep their phone Android version up-to-date, including with security parameters. However, if you are new with AAPS or are not a technical expert you might want to delay updating your phone until others have done so and confirmed it is safe to do so, on our various forums.
delaying Samsung phones updates
Samsung has an unfortunate track record of forcing updates of their phones which cause bluetooth connectivity issues. To disable these forced updates you need to switch the phone to “developper mode” by: go to settings and about then software information, then tap build number u til it confirms you have unlocked developer mode. Got back to main settings menu and you should see a new developer options menu item. Open developer options and scroll to find auto system update and turn it off
Google Play Protect potential Issue
There have been several reports of AAPS being shut down arbitrarily by Google Play Protect every morning. If this happens you will have to go to the google play options and disable “Google Play Protect”. Not all phone models or all Android versions are affected..